Introduction to the World of Warcraft Raid Guide

Welcome to WoW Raid Guide, an indepth guide to raiding in World of Warcraft the Wrath of the Lich King and beyond!
In this blog I will be writing walkthroughs and videos on how to take down those WoW raid bosses that have been giving your guild trouble, how to survive PUGs and how to advance into the end game content of World of Warcraft with step by step instructions and guides. Ontop of how to beat WoW instance bosses I will be giving boss and class information, helping you improve how you play your character and which professions may prove useful to you in and out of the instances and raids in World of Warcraft.

Monday 22 June 2009

Naxxramas Instructor Razuvious 25 Man Guide

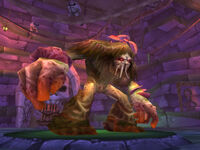
Instructor Razuvious is the first Naxx Boss in the Military Quarter. in this wow raid guide we will explain how to take down this difficult addition to the new 25 man Naxxramas.

So lets get down to basics, Instructor Razuvious has 10,000,000 HP and hits plate for 30k damage. It is a huge amount and that is why your priests will come to the fore with Mind Control during this instance. the key to taking down this WoW boss is through his understudies, but I will go in to that later, for now lets go over Razuvious's skills in 25 man Naxx!

  • Disrupting Shout - This physical AoE hits for between 7125 to 7900 physical damage on the entire raid, this is unavoidable and is cast every 15 seconds.
  • Jagged Knife - Jagged Knife is used on a random member of your raid about once every 10 seconds. It does 5k dmaage instantly and applies a bleed affect which deals a further 10,000 physical damage over 10 seconds. This can be avoided by standing out of Razuvious's line of sight.
  • Unbalanced Strike - Inflicts 350% weapon damage and applies the Unbalanced debuff. This reduces the players defence by 100 for 6 seconds. Due to Razuvious's massive damage output this hits for over 100k so only Death Knight Understudies should ever be hit by this ability!
So far I have mentioned the Death Knight Understudies a couple of times, but not really explained what they are for. Basically your priests need to mind control these guys to tank Razuvious. They don't hit for much and can be tanked easily, and should not be killed the end (when they take a huge amount of damage from your DPS, 1000%). Lets go over what makes up the Death Knight Understudies.

  • Blood Strike (Button 4) - Causes 50% extra weapon damage to the target, has a four second cooldown.
  • Taunt (Button 5) - Use this to taunt the boss, this lasts ten seconds and has a 20 seconds and has a 20 second cooldown from cast.
  • Bone Barrier - Bone Barrier should be kept up when tanking the boss, it reduces the damage taken by 75% for 20 seconds and has a ten second cooldown.

Razuvious 25 Man Strategy Guide

First off, to complete this boss you will need a main tank to keep hold of the Death Knight Understudies. You will need two to three priests, depending on your raid groups skill, to mind control the Adds to tank the main boss. Two priests can sucessfully control the boss through mind control, however if you do not have the setup exactly right a third priest can keep a Death Knight understudy mind controlled ready to jump in if required. Mark the understudies so the priests know which ones to mind control.

To heal through this boss you will need one dedicated Jagged Knife Healer and two to three understudy healers. You should also keep a raid healer handy to cover any excess damage.

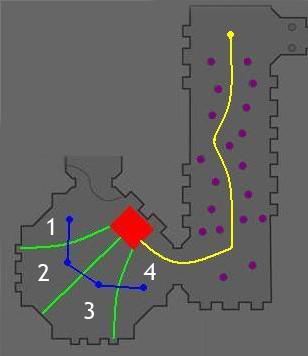
The pull is the critical point of this fight, fail to do do this correctly and there is a high chaince the raid will wipe.

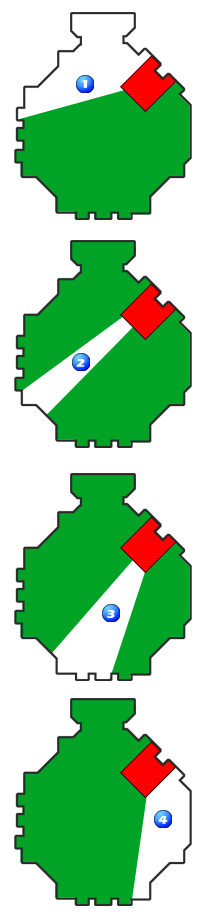
The tank should go down he steps about 3/4 of the way first, this should pull the understudies. Razuvious will not come after the tank for 3-5 seconds. It is during this time in which the first priest must mind control an Understudy, raise it's bone barrier and then taunt the boss.

The priests should aim to stand at the bottom of the stairs and use the Understudies to tank the boss a the edge of the green circle. This should prevent mind control breaks and allow enough time to recast mind control before an understudy reaches a priest.
If you have four priests in your group you can mind control and tank with all four of the understudies.

This is the safest way to keep the boss under control, however it can gimp your raids healing or DPS.

When placing the understudies you should space them evenly apart around Razuvious so that the other priests instantly know when another priest has taunted the boss, because he will turn.

The main difficulty after this pull is keeping up an efficient rotation of mindcontrol, bone barrier, taunt. It may help if the raid leader has a go command for each priest, so tehy start their sequence at the correct time!

I hop this guide gives you some help in how to defeat Instructor Razuvious!

Saturday 6 June 2009

Naxxramas 10 Man Guide - Instructor Razuvious

Instructor Razuvious is a Death Knight Trainer, and is the first boss you will find in the Military Quarter of Naxxramas. Razuvious is a pretty hard boss to crack, not only because of his rather harsh skill set, but also because of his two understudies (Four in the 25 man version). The two understudies of Instructor Razuvious are dealt with differently in the Ten and Twenty Five man versions of this encounter.

In the 10 man version of Naxx Instructor Razuvious has around 3,349,000 hit points, and his regular hits damage for around 30,000! His abilities can also be quite devastating and require some intensive healing!

So lets have a rundown of some of the abilities of 10 man Razuvious!

  • Disrupting Shout - Disrupting Shout is a physical AoE attack that does
    4275 to 4725 physical damage to your entire raid every 15 seconds and cannot be avoided!
  • Jagged Knife - This ability is a harsh ability which occurs every ten seconds. It causes 5,000 physical damage and applies a bleed effect which causes a further 10,000 physical damage over five seconds. It is applied to a random raid member and can be avoided and can be avoided only by standing out of sight!
  • Unbalancing Strike - Causes 350% weapon damage and causes the Unbalanced debuff, reducing defence by 100 for 6 seconds. This hits for around 105,000 damage on the tank, only Death Knight Understudies should ever be hit by this!
Death Knight Understudies

When you pull Instructor Razuvious in the 10 man version of Naxxramas you will also pull two Death Knight Understudies. These hit lightly and you must mind control these throughout the fight using Orbs of Domination to and your healers should keep the two Death Knight Understudies healed at close to full health. Once Razuvious is dead they will take 1000% damage from your raid's attacks so you will be able to take these guys out in
no time after the fight has ended!

The Death Knight Understudies have their own abilities, none of which are particularly dangerous to your own raid, but must be understood as when mind controlled you will need to use them to tank Instructor Razuvious. the skills of the Death Knight Understudies are,
  • Blood Strike - An instant attack that inflicts 50% extra weapon damage to an enemy target and has a four second cooldown. This will be number 4 on your hotbar for quick casting!
  • Taunt - Used to taunt Razuvious, has a twenty second cool down and is attached to number 5 on the hotbar
  • Bone Barrier - Reduces damage taken by 75% for 20 seconds, Death Knight understudies should always have this up when they are mind controlled and tanking. This has a 30 second cool down so be ready for this so the two tanks mind controlling can switch agro using Taunt. Healers should also prepare for this just in case, it may be necessary to do some large scale healing at this point!
10 Man Strategy for Instructor Razuvious

To defeat Instructor Razuvious in Ten Man Naxx your raid group must learn to utilize the understudies. At the beginning of the fight your tanks must go to the orbs to control the adds, one around 10 seconds after the first. Razuvious will gain agro on these, meanwhile both tanks should cast bone shield before they agro, and one should taunt the boss. A few seconds before the first tank loses agro the second tank should taunt the boss away, this should be repeated until the boss is taken down.

Bone barrier must also be cast before every taunt to keep the tanks up effectively, and while this can be healed through for short periods it is advisable that the tanks swap agro before they lose this.

Both the tanks should spam Blood Strike to ensure they maintain agro over DPS.

A good way of ensuring things go smoothly here is to switch tanks every 16 - 17 seconds rather than waiting until the 20th, healers should be aware of this however so they can heal accordingly.

Your tanks should remember that they lose mind control after one minute, so they must be prepared to shout agro and disengage in some order, rather than both losing agro at the same time. While you can disengage mind control remember that you must do this form the buffs bar, not the leave vehicle button.

When the tank disengages and re-engages they must remember that there is a 5 second cooldown on the understudies abilities.

This is pretty much all you need to know to take down Instructor Razuvious, the first boss of the Naxx Military Quarter in the ten man version of Naxxramas!

Sunday 31 May 2009

Naxxramas Loatheb 25 Man Raid Guide


Loatheb is (as you might have read in our 10 man WoW Naxx Guide) one hell of a difficult fight for disorganised raid groups. The main reason for this is that your healers only have a 3 second window for heals to take affect, please note that HoT's will no continue past the three seconds.

This is the only difficult part of the fight itself, the Wrath of the Lich King boss is pretty easy and his damage is weak, the true challenge of this fight is simply healer co-ordination, something not really tested to teh max often in World of Warcraft fights!

Loatheb has a hefty 20,200,000 hit points and low melee damage, he beserks after 12 minutes so the boss fight MUST be finished by this point!

Unlike the majority of WoW bosses, Naxx or otherwise, Loatheb creates spores which actually buff your raid very nicely, it is imperative that you learn how to use these buffs correctly to win the fight. First however, lets do a quick run down of the abilities of Loatheb in 25 man Naxxramas.

  • Necrotic Aura - This is the spell which makes the fight against Naxx Boss Loatheb so damn difficult. Necrotic Aura covers the entire taid and reduces all healing done by 100% for 17 seconds, 3 seconds after it expires it is recast, so three seconds is all the healers get in this fight!
  • Deathbloom - The reverse of druids 'Lifebloom' Deathbloom does 400 nature damage a seconds for five seconds followed by a final 1500 nature damage hit. Just to give priests warnings, the DoT ticks will not be absorbed by your Shield, however the final 1500 will be. This is undispellable.
  • Inevitable Doom - Loatheb will begin to cast Inevitable Doom two minutes after the fight begins. After this has been cast there is a ten second pause before it inflicts 5000 Shadow damage. This is cast every 30 seconds thereafter, 5 minutes after the fight begins this will increase to every 15 seconds. This cannot be dispelled however Ice Block, Cloak of Shadows and Divine Shield will remove it!
  • Fungal Creep - This is a beneficial debuff which gives 50% and removes all threat generation plus wipes all previous threat) from those affected to up to 5 players standing within 10 yards. A new spore spawns every 20 seconds and the buff lasts for 90 seconds, so careful co-ordination is required to ensure that all DPS and then healers get full use of this fantastic buff. The tank should always stay well clear of these spores so he does not lose their threat.
Naxxramas Loatheb 25 Man Strategy Guide

The Loatheb boss fight is quite simply a DPS race with some rather intensive healing needed every 20 seconds. When the healers are not healing they should be fulfilling several other roles to help ensure the smooth running of the fight.

The spores are key to a fast wipe free take down of the naxx boss Loatheb. Your DPS should be organised in to groups, with the highest DPS in the first group and then in decreasing order in the other groups. This will ensure you are taking full advantage off the crit buff, and allowing your DPS to go on all out damage, since they generate no threat.

The healing is the hardest part of this fight, two healers are normally required to top up the tank during the three second period, the other healers should focus on raid healing. Priests can cast Power Word: Shield, likewise the Paladins Sacred Shield, during the healing debuff period, this can be a lifesaver, especially if you are having trouble keeping the tank up!

It is sometimes suggested that one priest keeps up a shield on the tank while any others cast it on other raid members who may die otherwise when Inevitable Doom or the final Deathbloom damage are coming up.

For the healers this is all about timing and getting the most out of the three second healing gap. HoT's should be stacked on the raid before the gap and a raid warning should be announced 3 seconds before so that healers can begin to cast their large heal/long cast spells.

Healthstones and potions will do nothing until the healing debuff is removed, so wait until this point before you chug these!

Shadow Protection potions are useful, since they prevent damage. not heal you.

To help healers everyone but the tank should chug a potion and/or start bandaging during the three seconds. While this may not seem like much it can help save a raid group who have low healing.

Follow all these tips and before you know it your raid group will have downed the Wrath of the Lich King Boss Loatheb in the 25 man version of Naxxramas!

Friday 29 May 2009

Naxxramas Loatheb 10 Man Guide

Loatheb is a gigantic plague ridden bog beast from Azeroth who has been beefed up to the max in Wrath of the Lich King. Loatheb is particularly akward for most raid groups due to his quite painful 100% anti-healing spell, which gives your raid no healing ability for 17 out of every 20 seconds of the boss fight.

This Naxx fight has become significantly more difficult since the priests AoE healing spell Circle of Healing was nerfed (Yes, they nerfed possibly the weakest, most expensive healing spell since Holy Nova was removed from the Talent Tree) to a six second cooldown, it has been considered that this fight is the sole reason this happened.

This massive gimp on healing may make the fight seem near impossible, and indeed to an unprepared raid group this fight is impossible, fortunately there plenty of ways you can boost your raid group to get it through the fight. Deadly Boss Mods is pretty much essential during this boss fight since you have so few oportunities to heal the raid members!

So lets get on with the basics on this boss, Loatheb has 6,690,000 hp and has pretty weak attacks, as mentioned earlier the real danger from Loatheb is from his anti-healing spell Necrotic Aura.

Loatheb has several abilities and effects, near unique is the fact that Loatheb gives out a positive buff,

  • Necrotic Aura -Every 20 seconds Loatheb will cast Necrotic Aura on your entire raid group. This will reduce all healing by 100% for 17 seconds. This does mean you only get one 3 seconds chance to heal every 20 seconds!
  • Deathbloom - Once every 30 seconds Loatheb will cast Deathbloom on the raid, giving a DoT that does 200 nature damage a second for six seconds with a final 1200 natura damage hit at the end. This is unfortunately undispellable.
  • Inevitable Doom - Once two minutes has passed Loatheb will begin to cast Inevitable Doom. This inflicts 4000 Shadow Damage after 10 seconds and is cast every 30 seconds. 5 minutes after the fight started this will go down to every 15 seconds. This cannot be dispelled however but Ice Block, Cloak of Shadows and Divine Shield will remove it.
  • Fungal Creep - This is a pretty much essential ingredient to this fight. To take down Loatheb you need to nuke him down as fast as possible, this buff gives a 50% critical strike chance and cause no threat for 90 seconds. You receive this buff by killing spores that Loatheb will spawn every 30 seconds. This cannot be held by more than 5 people in the raid so this should only be picked up by your DPS.
Loatheb 10 Man Strategy Guide

Your DPS should be in one group if possible and be followed by a priest with CoH and Precast ready on Prayer of Healing. Before this fight all classes should be awae of their own healing abilities and be able to time them in to the fight (I.E Deathnights get a full set of runes to pull off two Death Strikes, Warlocks cast Haunt 12-13 seconds before Necrotic Aura fades.

Since healers tend to be next to useless for a large portion of the fight it is a great idea to have the healers anouncing new spores, heal points, (10-11 seconds HoT's spammed over raid, 3 seconds for long cast large heal spells to be cast on those on significant low HP)

Position wise the tank and Loatheb should be kept well away from any spores, this is pretty much essential, if the tank gets hit with the spores buff they will instantly lose threat/agro. Later on (after the third spore) it is possible for 100% of your group to get the Buff. This needs careful work but can be hugely benefitial to the raid group, but the next spore must be gained by the DPS to avoid threat being taken away from the tank.

Thursday 28 May 2009

Top WoW Addons - Deadly Boss Mods

Download Deadly Boss Mods Here!

Deadly Boss Mods makes it into my top WoW Raid Mods with ease. It is incredibly easy to use, simply install it and during any instance or raid you will get handy pop ups warning you of certain events that will happen during the raid.

This may seem like just a nice to have, but during many raid bosses this addon is absolutely essential for a kill, Sucah as WotLK Naxxramas Loatheb or most Zul'Aman Bosses!

Tuesday 19 May 2009

Naxxramas Raid Guide - Heigan the Unclean 10 Man Guide


Heigan the Unclean can be either your worst enemy or best friend in Naxxramas, depending on your raids co-ordination this boss can be an impossible hurdle or a simple gear gaining step, though it is easier with this Naxx guide.

The reason this boss has such an unclear divide between difficulty is quite simply because of the four steps you need to dance through to take Heigan down. Failure to complete these steps by a single raid member will most likely result in a wipe, especially in the ten man version of Naxx.

But time to yet again get down to details, Heigan the Unclean has 3,060,000 hit points and as with the 25 man version the 10 man version of Heigan has some crippling disease effects. these affects are spread over two phases, the difference being that phase two also has a much faster motion of the movement pattern that you need to follow.

Phase 1

  • Spell Disruption - A 20 Yard AoE focused around Heigan which increases cast times by 300%
  • Decrepit Fever - This disease affects a random player and does 3k nature damage every 3 seconds and reduces the maximum hit points of all players within 20 yards by 50%
Phase 2

Heigan will begin to channel the following two spells at the start of phase two.
  • Plague Cloud - Deals 7.5k nature damage a second to any player that stays on the platform during phase 2, this can easily be avoided by getting off the platform before phase 2 starts.
  • Eruption - During Phase Two three quarters of the room will be hit by eruption every few seconds during phase two. This does 6600 to 7400 nature damage each time. Players near the edge of the safe spot will only be hit once, those in the unsafe spots will be hit multiple times, something that will nearly always kill the affected players!
Heigan the Unclean 10 Man Strategy Guide

To defeat Heigan the unclean in 10 man Naxx you simply have to follow the 'dance' which goes from one to four and then back again, as shown in he diagram above. During Phase One you can stand safely on this. In most raid groups the ranged dps and healers stand here in phase one while the boss is tanked through the safe spots at maximum range from the ranged DPS.

Remember it goes from one to four and back again, 1 - 2 - 3 - 4 - 3 - 2 - 1 and so on, remember that this resets at each phase. If your raid group is having trouble with this smoke flares may help!

Apart from that the healers should concentrate on keeping diseases clear and then you should have no problems on this Naxx Boss Heigan the Unclean!

Friday 8 May 2009

Naxxramas Raid Guide - Heigan the Unclean 25 Man


Heigen the Unclean is the second boss in the Naxxramas Plague Quarter, and the most infamous. Unlike the majority of other WoW bosses the strategy of this WotLK boss hinges entirely on your raid group moving to the correct locations in the correct sequence a tthe corect times.

The sequence you need to follow is 1-2-3-4-3-2-1-2 and so forth, this resets as soon as Heigan teleports so remember to move fast back to spot number one. This boss can be easy or hard depending on your guilds co-ordination, some groups can walk this while others have some real trouble!

But lets get down to the basics of this notorious boss, Heigan the Unclean has around 9,300,000 hit points. Heigan also has two phases both of which require movement in the sequence above, in the second phase however things move significantly faster!

He has several abilities which differ in the two different phases of the fight, these are

Phase One

  • Spell Disruption - 30 Yard constant AoE aura around Heigan that increases cast times by 300% - Druid Healers are good here as their insta cast heals are unaffected allowing them to move freely.
  • Decrepit Fever - A Disease that affects a random player causing 4,500 nature damage every 3 seconds and reduces the maximum hp of every player within 20 yards by 50%.
Phase Two

After 90 seconds Heigan the Unclean will teleport to the middle of the raised platform and begin channelling.
  • Plague Cloud - A dangerous spell causing 7,500 nature damage every second to any player still on the platform during this phase.
  • Eruption - Three quarters of the room will be affected by an AoE called Eruption every few seconds causing 6600 to 7400 damage. People near a safe spot will only be hit once, those in an unsafe spot will be hit several times, which will nearly always kill the affected raid member.
Heigan the Unclean 25 Man Strategy Guide

The fight has a 135 second cycle, the first lasts 90 seconds and the ground eruptions move slowly. Here your tank needs to pull Heigan from the north of the room to the middle of the room then towards the east of the room, as shown below following the blue line from one to four and back again. During phase 1 all ranged DPS and healers can stand on the platform (Red Spot) but must move into a safe zone to avoid

During phase two Heigan the Unclean teleports to the platform for 45 seconds. Ground Eruptions will speed up and the entire raid will need to move through the safety zones to avoid death by Plague Crowd.

Remember that whenever a phase change occurs it resets to zone one. if you are having trouble try using smoke flares to ensure that people move to the right areas.

This fight is pretty easy once you get used to the pattern, but be careful for Decrepit Fever, this disease can easily affect an entire raid when grouped together. Shamans and priests are useful here, cleansing totems should be up constantly, they should also try to keep Abolish disease up on a few raid members, particularly before the end of phase two.

Thursday 7 May 2009

Naxxrmas Raid Guide - 10 Man Noth the Plaguebringer

Noth the Plaguebringer is the first boss you will meet in the Plaguequarter of Naxxramas. While this boss is pretty simple he does require good off-tank control and some concentrated dispelling of curses to avoid a raid wipe.

Noth is a pretty quick boss to take down with a well organised group, he has two phases, the second of which you should only see once. This involves good off-tank control, during the main phase it is important to re-iterate that decursing raid members must be ready to decurse Curse of the Plaguebringer as soon as it is cast.

Noth the Plaguebringer has around 2,500,000 hp and will spawn several adds during the fight, learning his abilities is a crucial aspect of this fight. Noth's abilities are,

  • Curse of the Plaguebringer - Curses three of the raid members, these player must have the curse removed within ten seconds or else Wrath of the Plaguebringer will afflict the player.
  • Wrath of the Plaguebringer - If Curse of the Plaguebringer is not removed everyone within 30 yards will be hit with 3700 to 4300 shadow damage. A DoT will also be applied which causes 1300 to 1700 shadow damage every 2 seconds for ten seconds. This can be handled diferently to the 25 man version of the instance, if you have no decursers it can be healed through if the afflicted players move to different corners of the room, away form the rest of the raid.
  • Summon Plagued Warriors - After every 30 seconds Noth the Plaguebringer summons two Plagued Warriors, these guys have around 100k hp and hit for 1k on plate. these guys cleave, so keep tanks infront and DPS behind.
After the first phase has lasted 110 seconds the second phase begins. During this time Noth will transport himself to a balcony and become invincible. This phase lasts 70 seconds and two waves of two skeletons will occur during this time. There are two different kinds of adds you may encounter, however if done correctly you should only find yourself dealing with Plagued Champions.
  • Plagued Champions - Plagued Champions in the 10 man version of Naxx have around 105,000 hp and hit for around 2.5k on plate. They have mortal strike so keep the off-tanks health up.
  • Plagued Guardians - Plagued Guardians only come in the second occurrence of phase two onwards. They have 75k hp and hit for 1k on plate. they cast arcane explosion at very regular intervals causing 4k damage to all players in range (30 Yards) one of these will replace one Plagued Champion in each wave. However Noth can usually be taken down before Phase Two is repeated, so you may not encounter these.
Noth the Plaguebringer 10 Man Strategy Guide

Just like the 25 man version of this raid it is essential that the curses are dispelled as soon as possible. Although it is possible to heal through the curses in the 10 man version it is not the easiest way to finish this boss. If you have no decursive ability in your raid group then the three people affected by the curse need to run to opposite sides of the room to minimise damage.

The first stage is pretty simple, deal with the curses as above, preferably be decursing, while hitting Noth with all the DPS you have, including the off tank. When the adds arrive your offtank should take hold of these and the DPS should burn them down before returning to the Plaguebringer. Repeat this till you hit the second phase and then deal with the adds by the tank taking one and the off tank taking the other!

Keep healing up because shadow shock can deal a lot of damage to your raid, so ranged dps and healers keep your distance!

You should be able to take down this boss quickly and easily and it's a pretty cool introduction to the Plague Quarter of Naxxramas!

Wednesday 6 May 2009

Naxxramas Guide Noth the Plaguebringer 25 Man

Noth the Plague Bringer is the first boss in the Plague Quarter, he casts a fair number of spells, most of them however are curses requiring at least 3 decursing classes to keep your raid alive with ease.

This is a fairly simple fight with two main phases and both of these can be handled by even an amature raid group due to the fights simplicity. blink must be watched out for however as Noth's agro resets, so the raid must stop quickly allowing the tank to regain agro.

But lets get right down to the basics, Noth the Plaguebringer has 8,440,000 hit points. He also spawns up to three different kinds of adds, plagued warriors which have 125,000 hp, Plagued Champions which have 130,000hp and Plagued Champions which have 100,00 hp, however I will talk more about this after I have covered Noth's abilities.

Noth the Plague Bringer has several abilities which require good decursing more than anything else.

  • Curse of the Plaguebringer: Curses 10 random raid members around every 50 seconds, if they are not decursed within 10 seconds then Wrath of the Plaguebringer will be cast on the player and all raid members within 30 yards.
  • Wrath of the Plaguebringer: If Curse of the Plaguebringer is not decursed a large number of raid members will have Wrath of the Plaguebringer cast on them. This causes an immediate 5550 to 6450 shadow damage and applies a dot giving 3150 to 3850 Shadow damage every two seconds for ten seconds. It is best to save potions in case this occurs, this way you can quickly restore some health and allow your healers to catch up with the sudden burst damage and have the curses dispelled.
  • Blink: Noth the Plaguebringer will blink periodically during the fight, he doesn't blink far but Agro is reset, so all DPS MUST stop until the tank regains agro. This has a 25 second cooldown and tends to happen straight away, so any long cast time spells should not be started during this time.
  • Cripple - When he blinks all players around his location before the blink will be crippled, this slows movement by 50%, reduces attack speed by 100% and strength by 50%. This is dispellable and a dispelling class should be ready to remove this from the tank as soon as possible. A well timed mass dispel can work wonders here.
  • Summon Plagued Warriors: Every 30 seconds Noth the Plaguebringer will summon three Plagued Warriors. Plagued Warriors have around 125,000 hit points and hit for around 3k on plate, off tanks should pick these guys up ASAP.
In phase two of this fight Noth will teleport away and will become invincible for around 70 seconds. During this time the raid group will be attacked by waves of skeletons, after which you will return to phase one. Phase two occurs every 110 seconds, and depending on your raid groups skill you may see either one or two types off adds.
  • Plagued Champions - Plagued Champions have around 130,000 hp, the hit for around 3.5k on plate and also hit with Mortal strike and Shadow Shock (a 25 yard AoE focusing on the add causing 29600 to 3500 shadow damage within range. It is cast random and has a very low cooldown.
  • Plagued Guardians - These appear from the second phase onwards, effective raid groups will kill Noth before phase 2 repeats so should not see these guys. Plagued Guardians have 100,000hp and hit for 1k on plate. They cast Arcane explosion regularly which deals 6k damage to all raid members within 30 yards. Two of these will replace two Plagued Champions in each wave from the second iteration of Phase Two onwards.
Noth the Plaguebringer 25 Man Strategy

This is a fairly easy fight but you will need a minimum of 2 to 3 decursing players and 2-3 tanks depending on your raid groups quality. The tanks need to be ready by the piles of bones to pick up the adds and the decursers must be speedy in removing the curses, it helps to assign groups for this.

Noth himself does not do too much damage, unless you let the fight go for too long, at which point he does 1000% damage. It is important to note though that the real risk of this fight is not de-cursing fast enough, this can easily cause a wipe in even the best of raid groups.

Off-tanks should be ready to pick up the adds, but be ready to cause some DPS damage when possible. It is more than possible to take Noth out after only one second phase so the more DPS the better.

As phase two starts the off tanks should pick up the Plagued Champions/Guardians and spread them apart, Healers and Ranged DPS should keep their distance. Close DPS should stay together to minimise damage from the AoE Shadow Shock.

When Phase Two ends he nearly always casts Curse of the Plaguebringer. It is useful for the de-cursers to be aware of this so they can remove this curse before it does any damage to the raid.

All in all he is an easy enough boss, but still requires careful handling and good co-ordination from both your decursers and off tanks. Remember this and you should take down the first Plague Quarter boss with no trouble at all!

Saturday 2 May 2009

Naxxramas Raid Guide - Maexxna 25 Man

Maexxna is the final Naxxramas boss in the Arachnid Quarter, and she is by far the toughest of the three bosses that reside there. She is one hell of a dangerous boss to an unprepared guild, with plenty of raid breaking abilities and some fearsome stats. It is often considered that Maexxna is the first real taste you receive of the upcoming Naxxrmas bosses that you will encounter throughout the instance.

But lets get down to basics, Maexxna sits on around 7,600,000 hp in the 25 man version of Naxx, she also has some ferocious abilities which must be dealt with swiftly and correctly if your guild is going to pick up the rather tasty drops from this boss!

So without further ado, let us go over the Maexxna 25 man abilities!

  • Web Wrap - cast first at around 20 seconds and then 40 seconds after that, web wrap sends two of your players flying towards the webs on the western wall, upon which they will be cocooned The incapacitating cocoon causes 2400 to 3100 nature damage every 2 seconds, but only has 15k hp so can be removed with relative ease. To help simplify this the players will be cocooned at the same two spots so your dps can stand ready every 40 seconds to release the affected players from their cocoon.
  • Web Spray - A Complete AoE effect which incapacitates everyone in the room for 6 seconds as well as causing 2100 to 2800 nature damage. Tank must be buffed up with HoT's prior to this being cast!
  • Poison Shock - A cone shaped AoE that reaches for 15 yards infront of Maexxna causing 4500 to 5900 damage to all those infront of her, this occurs every ten seconds, but is easily avoidable by standing to the side, or behind the boss.
  • Frenzy - At 30% health Maexxna will frenzy, this increases her physical damage by 75% and haste by 50%.
  • Meaxxna Spiderlings - Eight small spiders are spawned 30 seconds in to the raid and 40 seconds thereafter. These only have 14k hp and hit for 2k on cloth, but must be dealt with quickly to avoid unnecessary deaths.
Despite this being the hardest boss in the Arachnid Quarter of Naxxramas it is also one of the quickest, the fight is generally over in around three minutes, and rests solely on your group navigating the different effects correctly, most importantly being web spray, where your tank must be HoT'ed to the brim to ensure he does not get killed while everyone is out of action.

The best way to play this boss is for the tank to take Maexxna close to a wall and then face her into the room, the raid should position themselves behind the boss with mages ready to frost nova and AoE the spiderlings. Ranged DPS should also be ready to take out the cocoons as soon as two of your raid members are afflicted by Web Wrap. the spiderlings must be taken out ASAP so they are dead before Web Spray, if any are left then some unlucky raid members will be taking damage while your healers are out of action, and will most certainly die.

Healers will need to put abolish poison and all HoT's on the tank before Webspray comes in to effect, if this is not done the Tank will most likely die.

When Maexxna hits 33% you should cut back on DPS until one last web spray has occurred, if you do not do this everyone may be immobilized while Maexxna is in frenzy, this can easily wipe a raid group!

Apart from that, good luck! The boss is not too hard if your group co-ordinates well and prepares correctly for each of Maexxna's abilities!

Naxxramas Raid Guide - Maexxna 10 Man

Maexxna is the final Naxxramas boss in the Arachnid Quarter, and is by far the toughest of the three bosses that reside in this section of Naxx. Maexxna is one hell of a dangerous boss to an unprepared guild, with plenty of raid breaking abilities and some fearsome stats. It is often considered that Maexxna is the first real taste you receive of the upcoming Naxxramas bosses that you will encounter throughout the instance.

But lets get down to the basic Maexxna Stats, Maexxnahas about 2,500,000 hp in the 10 man version of Naxx, she also has some ferocious abilities which must be dealt with swiftly and correctly if your guild is going to pick up some fantastic drops from this boss!

So without further ado, let us go over the Maexxna 10 man abilities!

  • Web Wrap - cast first seconds in to the fight and then every 40 seconds thereafter, web wrap sends one of your players hurtling across to the Western side of the walls. When they hit this they get wrapped in a cocoon which incapacitates the affected player. There are two spots where the player will be cocooned so DPS should be ready and waiting, the spot alternates back and forth between the two positions. The cocoon has around 6k hp so the DPS should be able to take it out quickly, which is pretty vital as the cocoon effect causes 2400 to 3100 nature damage every 2 seconds!
  • Web Spray - A total AoE effect which incapacitates everyone in the room for 6 seconds and also causes 1700 to 2250 nature damage. Tank must be buffed up with HoT's prior to this being cast or else they will die!
  • Poison Shock - A cone shaped AoE that reaches for 15 yards ahead of Maexxna causing 3500 to 4500 damage to all those infront of her, this occurs every ten seconds, but is easily avoidable by standing to the side, or behind the boss.
  • Frenzy - At 30% health Maexxna will frenzy, this increases her physical damage by 50% and haste by 50%.
  • Meaxxna Spiderlings - Eight are spawned at 30 seconds in to the fight and every 40 seconds thereafter. These only have 7.5k hp and hit for 1k on cloth, but must be dealt with quickly to avoid unnecessary deaths.
Despite this being the hardest boss in the Arachnid Quarter of Naxxramas it is also one of the quickest, the fight is generally over in around three minutes, and rests solely on your group navigating the different effects correctly, most importantly being web spray, where your tank must be HoT'ed to the brim to ensure he does not get killed while everyone is out of action.

The best way to play this boss is for the tank to take Maexxna close to a wall and then face her into the room, the raid should position themselves behind the boss with mages ready to frost nova and AoE the spiderlings. Ranged DPS should also be ready to take out the cocoons as soon as two of your raid members are afflicted by Web Wrap. the spiderlings must be taken out ASAP so they are dead before Web Spray, if any are left then some unlucky raid members will be taking damage while your healers are out of action, and will most certainly die.

Healers will need to put abolish poison and all HoT's on the tank before Webspray comes in to effect, if this is not done the Tank will most likely die.

When Maexxna hits 33% you should cut back on DPS until one last web spray has occurred, if you do not do this everyone may be immobilized while Maexxna is in frenzy, this can easily wipe a raid group!

Apart from that, good luck! The boss is not too hard if your group co-ordinates well and prepares correctly for each of Maexxna's abilities!

Monday 20 April 2009

Naxxramas 25 Man Guide Grand Widow Faerlina


The 25 man version of Grand Widow Faerlina can be a daunting task, on top of the four worshippers in the 10 man version of this raid Faerlina has two Followers. These should be killed straight away, they have an AoE silence and will charge random raid members, something that can easily disrupt a raid.

In the 25 man version of Grand Widow Faerlina has around 6,760,000 and has some raid testing abilities which will ensure you raid's co-ordination is enough for the coming battles in Naxxramas. Some of Faerlina's abilities will really test your abilities, they are designed to cause widespread damage as well as some huge one target damage if you are not careful.

Grand Widow Faerlina's abilities in the 25 man version of Naxx are,

  • Poison Bolt Volley - Faerlina's Poison Bolt Volley hits the closest ten players to Faerlina, it is used around every 15 seconds and deals 3300 to 4200 nature damage, as well as applying a dispellable DoT that does around 1900 to 2100 nature damage every 2 seconds for 8 seconds. Widows Embrace prevents the use of this for 30 seconds.
  • Rain of Fire - Grand Widow Faerlina will cast her rain of fire spell repeatedly through the fight every 6 to 15 seconds. her rain of Fire spell has an 8 yard AoE radius and causes 3700 to 4300 fire damage every two seconds for six seconds.
  • Frenzy - Faerlina's frenzy can easily break a raid group, she hits for 150% more, has a 50% melee haste increase and during this time will cause 20k damage. This must be dispelled ASAP with Widow's Embrace
Grand Widow Faerline also starts this boss fight with two followers and four wirshippers. the Worshippers should be stockpiled for mind controlling and Widow's Embrace, the followers however must be nuked. In the 25 man version of this raid you need only mind control the worshippers to kill them, so at the right time a priest should mind control the worshipper with the lowest HP, move it towards Faerlina and then when stood next to her Widow's Embrace should be cast.

Technically the followers can be tanked for the entire fight, however they charge random people and have an AoE silence. For this reason I suggest your group learns to take these two adds down in under 30 seconds.

All there really is to this fight is the co-ordination on the mind controls just as frenzy hits. You need to cause some major damage fast, but with a good raid group you should have no problem taking down the boss Grand Widow Faerlina!

Sunday 19 April 2009

Naxxramas 10 Man Guide Grand Widow Faerlina

After you have finished off Anub'Rekhan you will come across Grand Widow Faerlina. Faerlina is the skill check, as Anub is the gear check. Grand Widow Faerlina has plenty of abilities which will throw your raid group in to disarray so you must be careful to have a strong raid composition and co-ordination to ensure that this boss takedown goes as well as possible.

Grand Widow Faerlina starts the fight with around 2,230,000 hp and four worshippers, these are integral to the fight and must be controlled carefully. but first lets go over Grand Widow Faerlina's 10 man raid abilities.

  • Poison Bolt Volley - Faerlina's Poison Bolt Volley will hit the three closest players to her for 2600 to 3400 damage each, this also applies a dispellable DoT which does 1400 to 1750 nature damage every 2 seconds for eight seconds. Widow's Embrace prevents Faerlina form using this for 30 seconds. She will generally cast this once every 12 to 15 seconds however it can be earlier as it is on an 8 second cooldown.
  • Rain of Fire -This rain of fire spell casts an 8 yard AoE causing Fire damage of around 1750 to 2750 every 2 seconds for 6 seconds. This is cast every 6 to 18 seconds and can easily be stepped out of.
  • Frenzy - Every 60 to 80 seconds grand widow faerlina will enter a frenzy. This should be mitigated by Widow's Embrace which we will come to later. Frenzy increases Faerlina's damage by 150% her melee haste by 50% and she will hit for upwards of 15k damage during this time.
Explaining Grand Widow Faerlina's Worshippers.

Grand Widow Faerlina starts the fight with four Worshippers. These will need to be off tanked at the beginning of the fight, but should not be killed. Upon death the worshippers (in the ten man version of this boss fight) cast Widow's Embrace, which removes Faerlina's frenzy and silences her nature school for 30 seconds!

In 10 man Naxx Grand Widow Faerlina's Worshippers are immune to mind control, so should be taken down to about 5% one after another so they can be killed a the right time. Before you kill them take them close to Faerlina so you can guarantee their death!

Naxxramas 10 Man Guide Grand Widow Faerlina

Taking down the Naxx boss Grand Widow Faerlina is all about Raid Co-ordination, especially in the 10 man version of the instance. The trick to getting through the boss Faerlina is controlling the additional worshippers to remove Faerlina's Frenzy.

Killing Grand Widow Faerlina can be done relatively easily with two tanks, The off-tank should be able to handle the worshippers and should tank them under the stairs. They barely deal any damage so they should be fairly easy to handle.

The main tank should hold Faerlina, the DPS Should focus on Faerlina but must be prepared to help the off tank if they are having trouble getting down a worshippers health ready for frenzy.

The Worshippers should be handled to around 5% health ready for Faerlina's frenzy, this is pretty much crucial so the Worshipper can be killed at the right time.

The right time to kill a worshipper is just after frenzy hits, the worshipper to be killed must be taken close to Faerlina and then nuked down instantly to keep Faerlina's Frenzy as short as possible.

You need to repeat this strategy for every upcoming Frenzy to take down Grand Widow Faerlina effectively, failure to stop her frenzy can easily cause a wipe and can be near impossible to fight through for an inexperienced raid group.

Saturday 18 April 2009

Naxxramas 25 Man Guide Anub'Rekhan

Like in the 10 man version of Naxx Anub'Rekhan is the also the first boss you wil have to kill in the 25 man Naxxramas raid. This Naxx boss is fairly easy to deal with and in this naxx raid guide to 25 man Anub'Rekhan I wills how you how to take this boss down with no trouble at all.

Anub Rekhan has approximately 6,765,000 hp in the 25 man version of this instance and two Crypt Guards will spawn, both of whisch should be dealt with immediately.

The abilities of Anub'Rekhan in a 25 man raid mode can be devastating, but are easy enough to avoid if your raid group follows their instructions carefully.

Anub'Rekhan's abilities are,

  • Impale - Anub's single most instant damage ability, impale will select a target from your raid and damage that player and all raid members between them and Anub for 5600 to 7400 physical damage and throw each player affected by this AoE into the air, causing 50% fall damage when they hit the ground. for this reason your raid members should use any slow fall abilities possible when hit by this to help save from accidentla death as well as your healers Mana.
  • Locust Swarm - This ability has a 60 second cooldown, but is generally used every 70 to 120 seconds. It will first occur between 80 seconds and 120 seconds into the fight. The Locust swarm ability does several things. First off though, it is a 30 yard AoE that is focussed on and will move with Rekhan. It causes a DoT which does 1300 to 1700 stackign damage every 2 seconds for 10 seconds. it also has a complete silence, which removes all abilities including Shield Wall, Last Stand and Even Auto-Attack. This lasts for around 20 seconds. When this spell is cast Anub will also spawn another Crypt Guard, which must be dealt with immediately.
  • Summon Corpse Scarab - At regualr intervals during the fight Anub Rekhan will spawn Corpse Scarabs from teh corpses around the room, this differs from Crypt Guard and raid member corpses. Raid members will only spawn 5 Corpse Scarabs, whereas fallen Crypt Guards will spawn 10 Corpse Scarabs. Mages should stand near Crypt Guard corpses so tehy can frost nova the scarabs as soon as they spawn. You should take these down quickly, they only cause around 1k damage on cloth but this can be the difference between a successful raid boss takedown and a wipe!
Crypt Guards are mentioned a lot here, so I think they deserve a short section explaining their abilities. The crypt guard abilities are fairly simple but important to understand. They must be dealt with quickly to avoid them breaking up an wiping your raid.

The Crypt Guard have around 521,000 hp and their abilities are,
  • Cleave - An attack which does 110% damage spread over three targets.
  • Acid Spit - A Stacking DoT that hits for 500 Nature damage per stack every two seconds for ten seconds.
  • Frenzy - When the Crypt Guard reaches a low HP it will frenzy causing 50% extra damage and increasing it's attack speed by 60%

Anub'Rekhan 25 Man Strategy Guide

While this boss can be done with two tanks it is far preferable to have 3 tanks on the 25 man version of Anub'Rekhan. The main tank should focus on Anub while the other two pick up the Corpse Scarabs and Crypt Guards.

The main tank should pick up Anub'Rekhan and move him straight back to the spot where Anub spawned. The two off-tanks should pick up their crypt guards and take them close to Rekhan, at which point the DPS should work on nuking down these two adds.

The DPS themselves should spread out in semi circles around Anub Rekhan to help minimize the effects of Impale, the mages should however stand close to the deceased Crypt Guards to pick up the Scarabs that spawn with Frost Nova.

The real challenge of this fight is dealing with Anub'Rekhans Locust swarm. As soon as this hits your raid group should form two groups, the first should contain your tank, one or two healers (Depending on your tanks gear) and preferably a hunter. The hunter should enable aspect of the pack and the tank should kite Anub'Rekhan around the ring of slime while the healers keep him topped up. Preferably everyone should remain out of range of the locust swarm.

During this another Crypt Guard will spawn and should be picked up and destroyed by the rest of the raid. Once this phase is over the main tak should return Anub to his previous position and the DPS can continue as before untill the next Locust Swarm

Naxxramas 10 man Guide Anub'Rekhan


Anub'Rekhan is one of the firs bosses you will meet in the Naxxramas 10 man instance. He has some raid breaking abilities at his disposal but generally you will find he is considered one of the easiest bosses in Naxxramas, and is a good gear check for some of the upcoming bosses you will face in this particularly entertaining raid instance.

Anub'Rekhan deals a lot of physical and nature damage, as well as providing your raid group with some fairly difficult diversions to keep he fight interesting. he starts at around 2,230,000 hp and has some devestating abilities at his disposal. This raid does not really test your raid groups co-ordination too much, but the fight will be a good basic gear check. Anub'Rekhan will use various abilities during this fight, these are,

  • Impale - A devastating ability that targets a random player and hits every other player that stands between Anub and his target in a straight line. This AoE attack causes between 4800 and 6200 physical damage and will throw each player hit into the air causing 50% fall damage when they hit the ground. Slow fall abilities should be used here if possible to save your healers mana.
  • Locust Swarm - On a 60 second cool down but generally used every 70 to 120 seconds Locust swarm is fairly easy to avoid but can be devastating if not handled correctly. During this phase Anub'Rekhan slows to 60% of his speed and the AoE Locust Swarm affect appears for 30 yards around him. Your raid must move out of this as soon as possible. Locust swarm causes a stacking debuff for 875 to 1125 Nature damage every two seconds and gives a strong silence to anyone affected. This silence removes all players abilities, including shield wall, auto attack and last stand for the tank. When this is cast you will also find another crypt guard will spawn at Anub's initial spawn point, this should be taken by the off tank and moved away from the Locust Swarm.
  • Summon Corpse Scarabs - At regular intervals Anub'Rekhan will spawn corpse scarabs from the corpses around the room. it helps if your mages can frost nova these straight away but it is not always possible. Depending on which corpse Anub'Rekhan chooses different numbers of scarabs will spawn, Crypt Guards will spawn 10 and regular player corpses will spawn 5. For this reason mages should always stay close to the Crypt Guard Corpses. These will automatically attack random targets when spawned.
The crypt guards themselves are a major part of this fight, they have around 234,000 hp and have some dangerous attacks that must be deals with correctly. These guys should be taken down as soon as they spawn. The first one will appear 20 seconds in to the boss fight, the next ones will spawn after every locust swarm.

The Crypt Guard Abilities are,

  • Cleave - The Crypt Guard does 110% damage spread over 3 targets.
  • Acid Spit - A stacking DoT affect that causes 500 nature damage every 2 seconds for ten seconds
  • Frenzy - When they hit low HP the crypt guards will frenzy giving them an additional 50% damage and 60% haste.
Anub'Rekhan Strategy

Killing Anub'Rekhan needs only a relatively simple strategy, but can cause some problems, and even wipes for unprepared guild runs.

The most reliable strategy for dealing with Anub'Rekhan is to form two groups. One with a healer, your main tank and a hunter if available, the other with your off-tank and other raid members.

The group with your main tank should kite Anub around the edge of the slime circle, your healer should keep up HoTs to make any damage from the locust swarm negligible and leave him free to deal with any damage the tank may suffer from Rekhan directly.

The other group should deal with the spawned Crypt Guard, once taken down the group should then form a moving semi-circle around Anub'Rekhan and continue to deal damage to the Boss.